
Replace an animation
Swap one hero animation clip for your own motion in Blender, keep the original length and frame rate, and pack only the new clip.
Replace one of a hero's animation clips with your own motion. You make the motion in Blender, point the game's clip file at it, compile it, and pack only that clip. You also need some Blender skill: Import a Deadlock model into Blender is a good start.
This guide follows two community guides from July and September 2026. Both came out before the City Never Sleeps update (2026-09-29), which broke many animation mods. Steps may differ on build 6779. Plan for a few rounds of trial and error.
What you need

Source 2 Viewer
latest dev buildCSDK 12
CS2 Workshop Tools
Blender and add-ons
4.5 or newerRokoko add-on
optionalThe hero's codenameSource 2 Viewer finds, previews, and decompiles the clip. CSDK 12 compiles it. CS2 Workshop Tools are there in case your clip does not compile right in CSDK 12. Blender needs the PulseSrcOps add-on to export DMX files. You need Rokoko only if you copy motion from another skeleton, and it needs a free Rokoko account.
What you can and cannot change
- You can replace one existing clip with your own motion. Your clip keeps the original name and path.
- You cannot add new moves or change when a clip plays. That needs the animation graph, and no public tool can edit it.
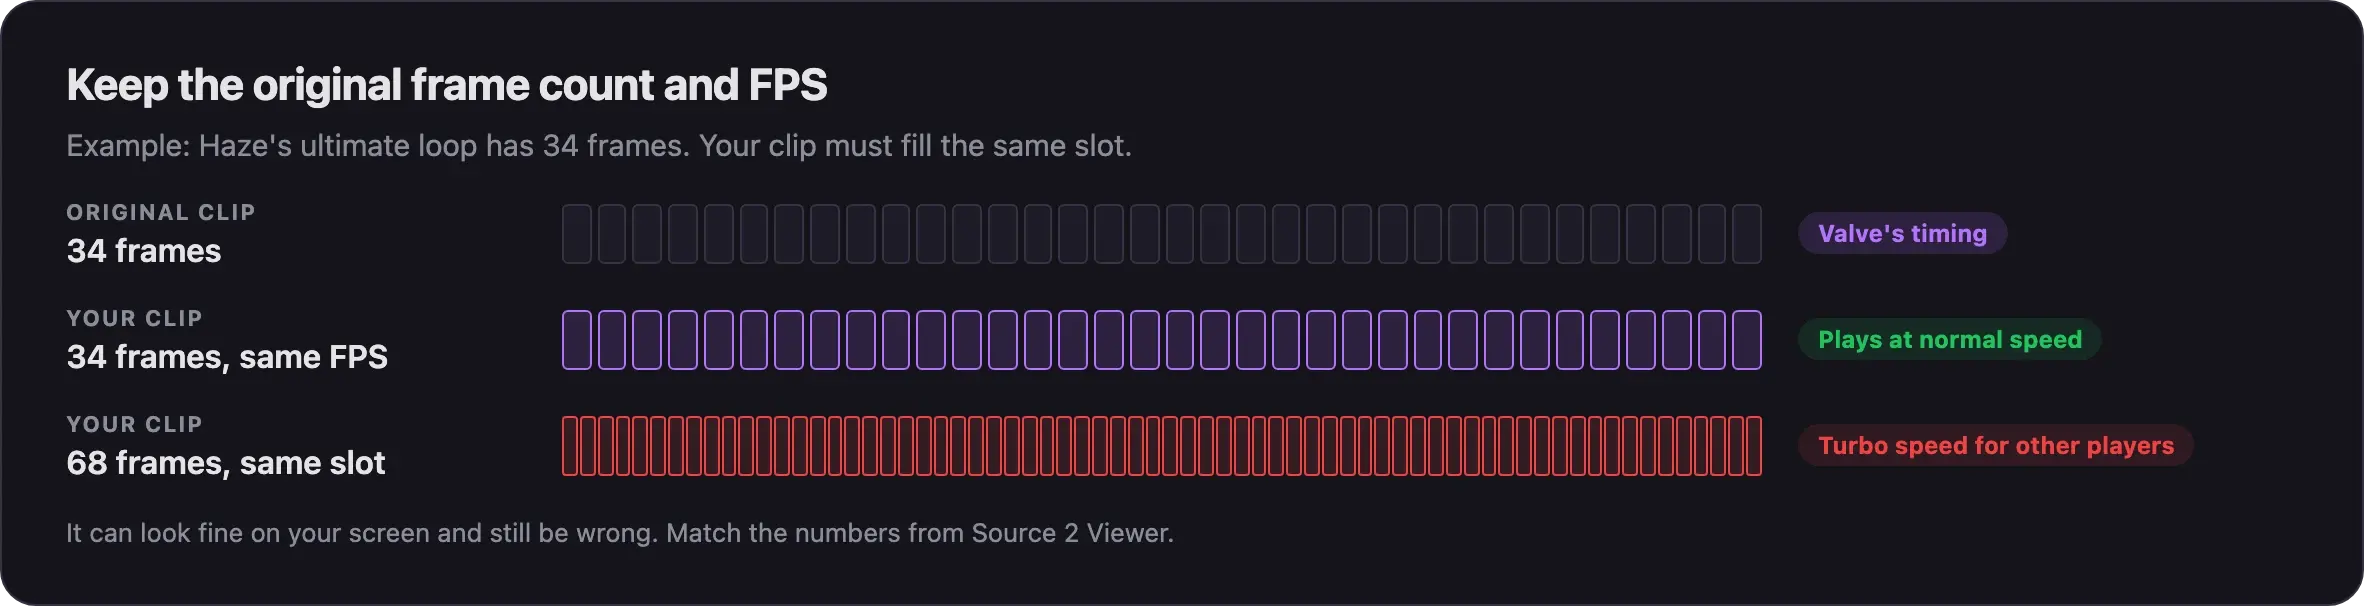
- You must keep the original frame count and frame rate (FPS).
If they differ, the clip can play much too fast ("turbo speed") in game, even when it looks right in your tools. One guide author found this in testing.
In build 6779, every released hero except Violet and Nurse Harrow uses this clip system (AnimGraph 2). This guide may not work for those two.
You see your animation on every player who uses that hero, enemies included. Never make an enemy's parry, heavy melee, or ultimate wind-up easier to read. Never change a hero's size or pose so it blocks less of your screen.
How it works
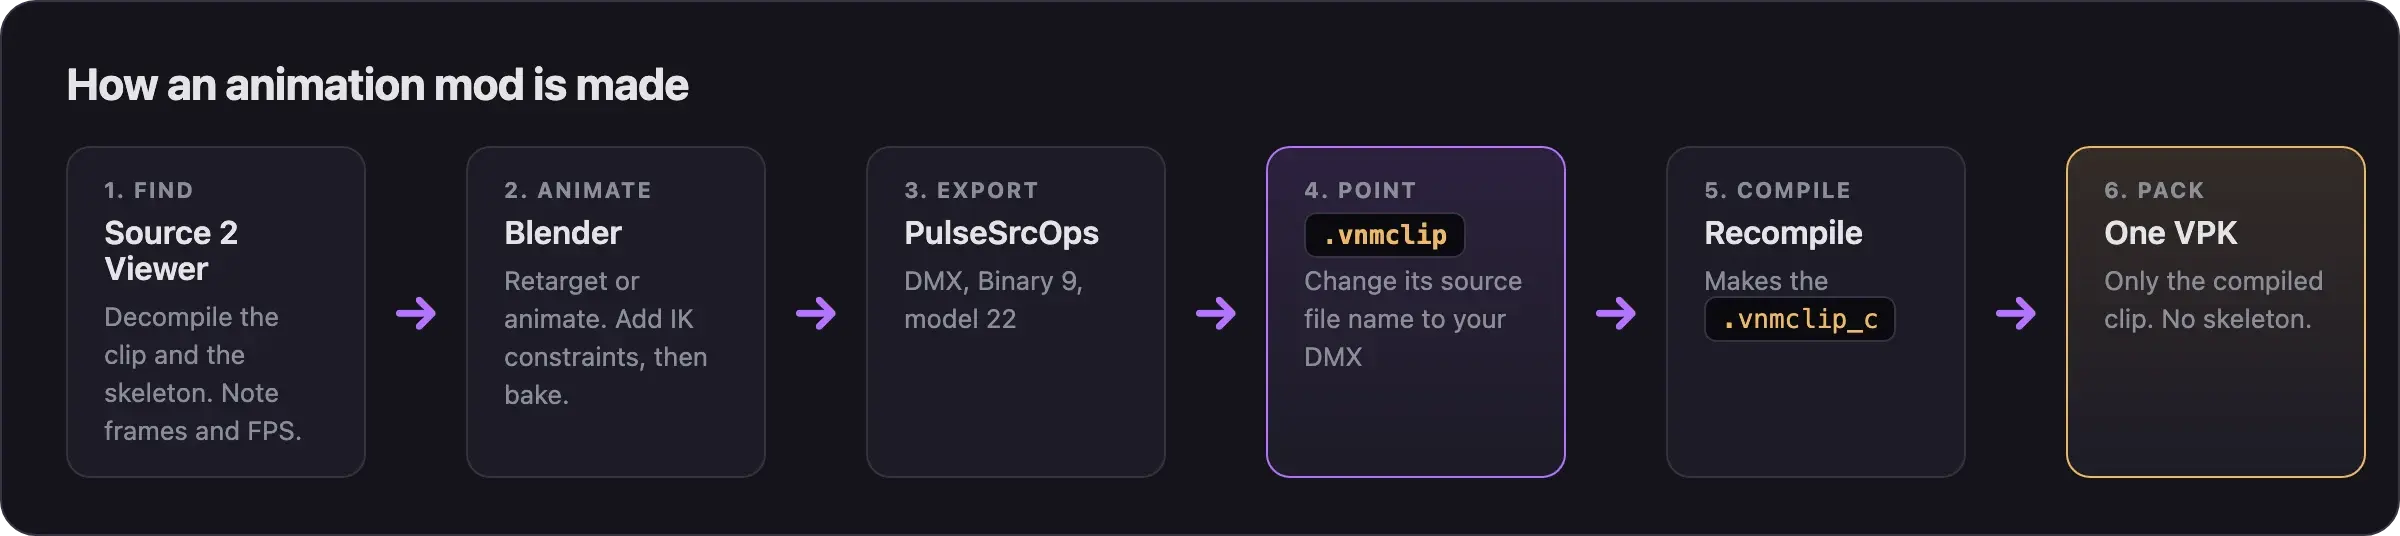
A hero's animations are clip files. Each source clip (.vnmclip) is a small text file that names an animation file (.dmx). You swap that name for your own DMX, then compile.
| File | What it is |
|---|---|
.vnmclip_c | One compiled clip. This is what you replace. |
.vnmskel_c | The hero's skeleton. You use it, but never ship it. |
Watch the walkthrough
This video by Pugzilla follows the same steps with Haze's ultimate.
The video was made before the September 2026 update. It compiles with CSDK 12, but its description now recommends CS2 tools for that step. Its Blender scale values (at 5:01) may differ with newer Source 2 Viewer versions.
Replace the clip
Find the clip
- Open Source 2 Viewer.
- Open
game/citadel/pak01_dir.vpk. - Go to
models/heroes_staging/<codename>/ormodels/heroes_wip/<codename>/. Older heroes are inheroes_staging, newer ones inheroes_wip. Look up the codename in Hero names and file paths. - Open the
clipsfolder. Each.vnmclip_cfile is one animation. - Click a clip to preview it. Haze's ultimate, for example, is
ability_bullet_flurry. - Write down the FPS, duration, and frame count from the Data section. Haze's ultimate loop has 34 frames.
- Write down the clip's full path and name.
- Open the hero's model (
.vmdl_c) and check its Data tab for the skeleton path.
The skeleton is not always next to the model. Pocket's model is in heroes_wip/pocket/, but its skeleton is heroes_staging/synth/synth.vnmskel. The clips sit next to the skeleton.
Set up the addon
- In the CSDK 12 launcher, create an addon. Use lowercase and no spaces, like
haze_dance. - Right-click the addon and choose Explore Content Folder.
- Rebuild the skeleton's folder path inside it, plus a
clipsfolder. Example:models/heroes_staging/haze/clips/. - In Source 2 Viewer, right-click the hero's
.vnmskel_cand choose Decompile & export. Save it in the skeleton's folder. You get a.vnmskeland a.dmx. - Right-click the clip you will replace and choose Decompile & export. Save it in
clips. You get a.vnmclipand a.dmx.
Bring the hero into Blender
- In Source 2 Viewer, right-click the hero's model and choose Decompile & export.
- Set the type to glTF. Save it in a work folder outside your addon.
- In Blender, choose File, then Import, then glTF 2.0 and pick that file.
- Tick the option that disables bone shapes, then import.
- Wait. Older heroes import slowly, because all their animations come along.
- Fix the armature's scale and facing. Follow the video at 5:01, then check the result against the original clip.
- Set the scene frame rate to the clip's FPS, rounded to a whole number.
- Set the frame range to the clip's frame count.
- Save your
.blendfile.
You can also import the clip's DMX with PulseSrcOps instead of using glTF. The VnmClip guide takes this route.
Retarget or animate
Animate by hand on the hero's armature, or copy motion from another skeleton. Copying motion between skeletons is called retargeting. Here is how with Rokoko:
- Import your source animation, for example with File, then Import, then FBX.
- Rotate and scale it to roughly match the hero.
- Select its armature, enter Pose Mode, and press A. Then press Alt+G, Alt+R, and Alt+S to clear the pose.
- Pose it roughly like the hero. Close is enough.
- Press N to open the sidebar, then click the Rokoko tab.
- Open Retargeting. Set Source to your animation's armature and Target to the hero's armature.
- Click Build Bone List. Match any bones it could not pair.
- Untick Auto Scale. Set Use Pose to Current.
- Click Retarget Animation.
- Hide the source armature and play the animation to check it.
If Rokoko fails after you install it, try its beta version. Pugzilla needed it.
Downloaded animations have their own terms. Read them before you share your mod, and see Credits, licenses, and permissions.
Add IK constraints and bake
Without these constraints, limbs can flip or break in game. Haze needs them, and they do no harm on other heroes.
- Select the hero's armature and enter Pose Mode.
- Open the Bone Constraints tab.
- Expand the armature in the Outliner. IK bones sit outside the
Pelvishierarchy. - Add Copy Location and Copy Rotation to each IK target bone. Set the target to the hero's armature, and the bone to the matching
HandorAnklebone. - Do the same for each IK offset bone. Use the matching
Lower_armorLower_legbone. - For a weapon or prop bone, go to frame 1, add a Child Of constraint, and click Set Inverse.
- Delete the keys on the
Root_motionbone, unless your move needs them. Extra keys there flip or offset the hero. - Check every pair once more.
- Bake the animation, so the constraints turn into keys.
Export the DMX
- Turn off any other Source Tools add-ons. They clash with PulseSrcOps.
- Open the Scene properties and find Source Engine Export.
- Set the DMX version to Binary 9 and the model format to 22.
- Set the export path to your addon's
clipscontent folder. - In the exportables list, untick everything except your animation.
- Click export.
- Move the new DMX out of the
animssubfolder intoclips. Deleteanims. - Give the DMX a short name, like
my_dance.dmx.
Point the clip at your DMX
- Open the decompiled
.vnmclipin a text editor. - Find the source file name near the top. It names the original DMX, such as
ability_bullet_flurry.dmx. - Change it to your DMX, such as
my_dance.dmx. - Leave everything else alone. The file also holds events the game needs.
- Save. Do not rename the
.vnmclipitself.
Compile
- In the CSDK 12 launcher, select your addon and click Launch Tools.
- In the Asset Browser, right-click your
.vnmclipand choose Recompile, then Full. - Right-click your addon in the launcher and choose Explore Game Folder.
- Open the same path, such as
models/heroes_staging/haze/clips/. Your.vnmclip_cis there.
CSDK 12 writes clips in an older format, says the VnmClip guide. Pugzilla's simple clip still worked. If yours fails in game, compile it with CS2 Workshop Tools instead.
Pack only the clip
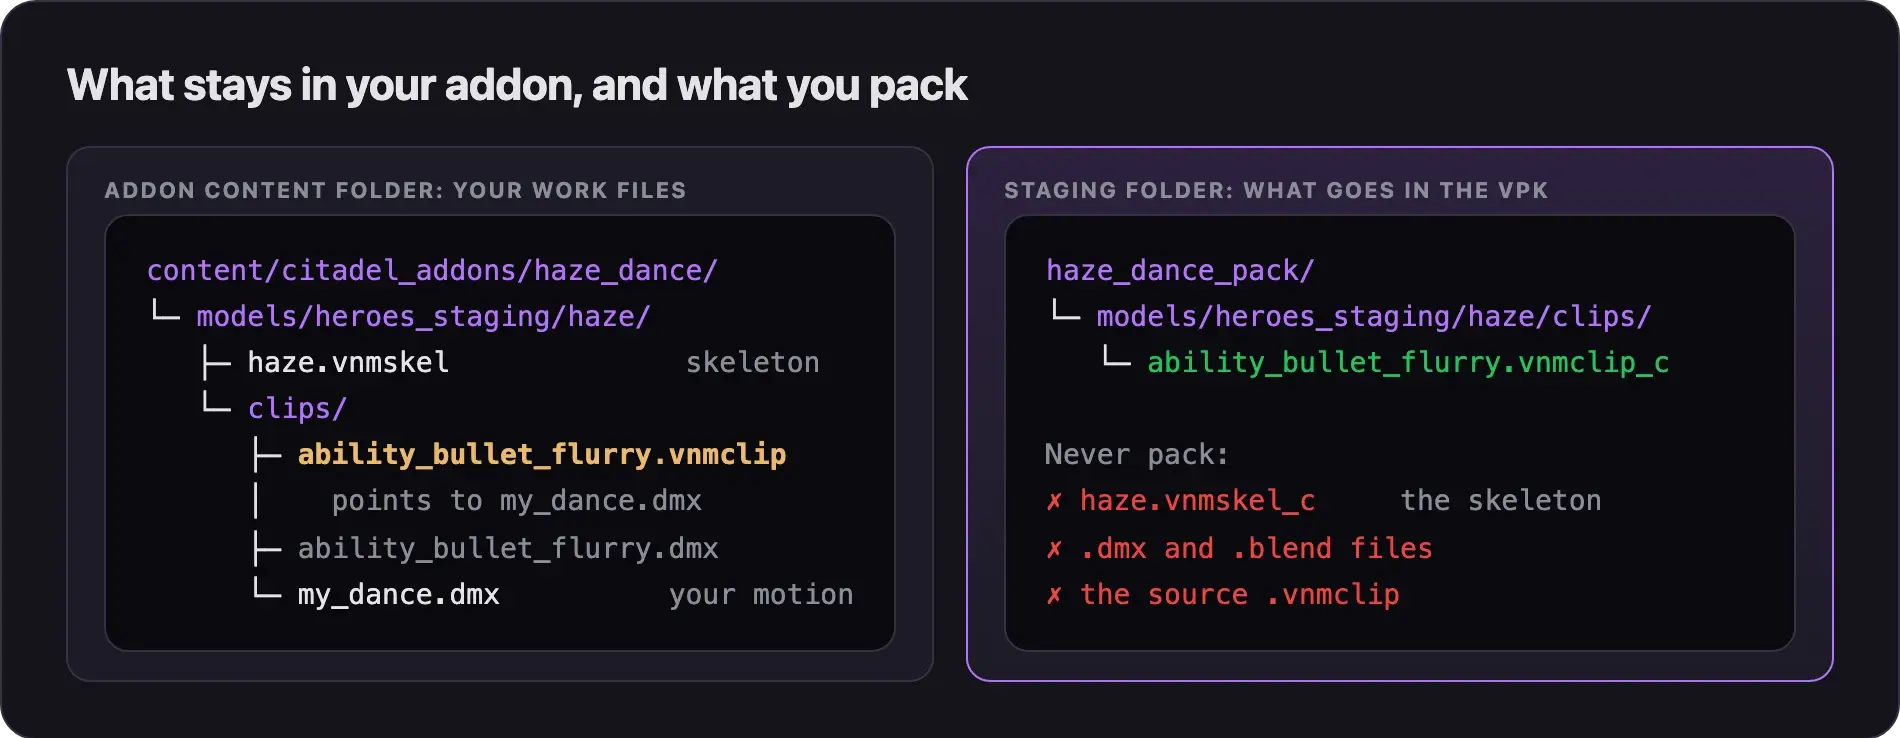
- Make a staging folder, like
haze_dance_pack. - Inside it, rebuild the clip's path:
models/heroes_staging/haze/clips/. - Copy only your compiled
.vnmclip_cinto it. - Pack the folder into a VPK. Follow Pack your mod into a VPK.
- Test the animation in a private match. Follow Test your mod in game.
Never pack the skeleton (.vnmskel_c). It replaces the game's skeleton, so a later update breaks your hero's other animations. It can also break other mods for that hero.
Common problems
Next steps
Full control over clips, events, and IK chains.
Divine is adding Deadlock mods. When they arrive, you'll publish yours from the Creator Panel.
Keep it working.
Credits
This guide is based on the work of these creators. Check out their original guides.
- Video: Deadlock - Simple Animation Changes by Pugzilla.
- Guide: Custom animation VmClip guide from Deadlock Modding Notes.
- Tool: PulseSrcOps by ToppiOfficial.
- Tool: Source 2 Viewer by the ValveResourceFormat team.
- Discussion: My character gets all twisted when modding the game by DrSmolscomics on r/DeadlockTheGame.