
Hero model swap: overview
What a full hero model swap involves, the tools you need, the rules you must keep, and the order of the four parts. Read this first.
A hero model swap puts your own character on a Deadlock hero. It is the biggest mod you can make: four parts, four tools, and a lot of checking. This page shows the whole path and the rules.
What a hero swap is
You rig your mesh to the hero's own skeleton and compile it at the hero's original path. The game still plays the hero's animations, abilities, and camera. Only the look changes.
Like every mod, it only changes your game. You see your skin on every player who picks that hero, enemies included. Other players see the normal hero.
Before you start
Do these two guides first.
Teaches ModelDoc and the Material Editor on a small model.
Gets the hero into Blender at the right size and facing.
Then plan the work:
- Plan a dry run. Pugzilla runs all four parts once with the unchanged hero mesh, then swaps in the new mesh. It proves your setup works before you put work into your own model.
- Pick an easy hero. Pugzilla learns on Vyper, whose model has few special parts. The video also notes two special cases. Pocket and Haze keep some animations in their model for particles. Haze also needs extra material groups for invisibility.
- Use your own design. Characters ported from other games, films, or anime carry copyright risk. See Credits, licenses, and permissions.
On build 6779, Violet and Nurse Harrow have no AnimGraph 2 graph of their own. Part 4 may not work for them, so pick another hero.
Tools

Source 2 Viewer
20.0+Blender
+ BlenderSource2ToolsCSDK 12
CS2 Workshop Tools
freeNotepad++
or another text editor| Tool | What it does | Parts |
|---|---|---|
| Source 2 Viewer | Exports the hero and reads original values | Start, parts 3, 4 |
| Blender and BlenderSource2Tools | Rig your mesh and export DMX | Part 1 |
| CSDK 12 | ModelDoc and the Material Editor build the model and its materials | Parts 2, 3 |
| CS2 Workshop Tools | Adds the AnimGraph 2 links and compiles | Part 4 |
| A text editor | Edits the .vmdl file by hand | Parts 2 to 4 |
Use Source 2 Viewer 20.0 or newer. Older builds decompile the camera attachments slightly wrong, which puts your camera in the middle of the screen.
The four parts
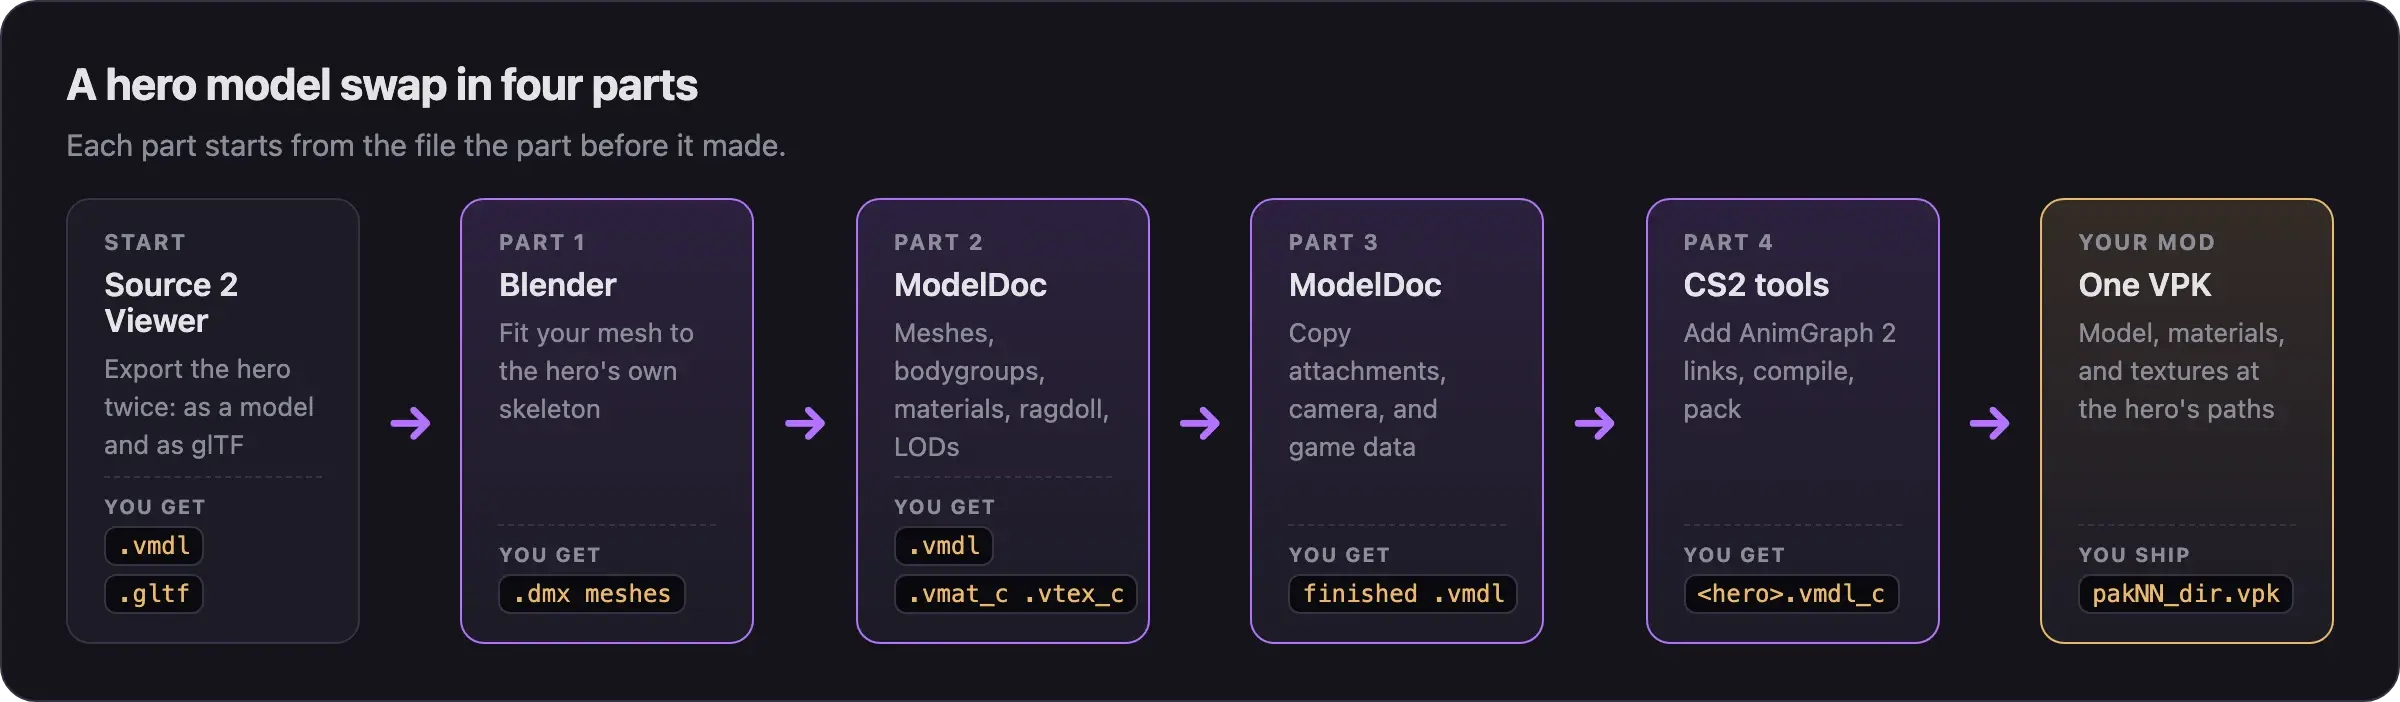
Export the hero, fit your mesh to its skeleton, and transfer the weights.
You get .dmx mesh files.
Swap the meshes, then rebuild bodygroups, materials, the ragdoll, and LODs.
You get a .vmdl that compiles, plus materials.
Copy the original's attachments, camera previews, and game data blocks. You
get a .vmdl with a working camera.
Add the skeleton and animation graph links, compile, and pack. You get the
hero's .vmdl_c in your VPK.
Part 4 needs a second tool kit. Almost every hero uses AnimGraph 2: its animations live in separate files, and the model must link to them. CSDK 12 cannot compile those links, so the last compile happens in CS2 Workshop Tools. Without them, the hero stands in an A-pose or does not turn.
Rules you must keep
These rules keep your swap cosmetic and stop it from breaking.
- Keep the skeleton. Never move, rename, or delete the hero's bones. You may add new bones for cloth.
- Keep the hitboxes. Leave the hitbox sets exactly as they are.
- Copy every attachment and game data block. They place the camera, the gun's aim point, the health bar, and some hero sounds.
- Never change camera values. Camera offsets and field of view come from the original. Changed values give you a wider or higher view than other players.
- Ship only what you made. Your
.vmdl_c,.vmat_c, and.vtex_cfiles. Never ship the hero's.vnmskel_cskeleton, its.vnmclip_canimation clips, or anything fromscripts/. They break other mods and break after updates.
A smaller, thinner, or taller model gives an advantage. It changes how easy the hero is to see and aim at. Match the original proportions. Do not make any part glow, turn see-through, or go very dark. Read What's allowed and how to stay safe.
Variations
Full video walkthroughs
Two creators recorded the whole pipeline. Watch one before you start, then use the part pages as your checklist.
Pugzilla's guide (March 2026, 56 minutes) swaps Vyper's model step by step.
Basilisken's walkthrough (May 2026, 86 minutes) builds an original bat creature on Drifter, with a cloth tail and the camera fix.
Both videos are older than the September 2026 update and use older tool versions. Pugzilla's description lists fixes found after recording, and Basilisken's lists scale values. Read them before you follow along. Where a part page differs from a video, follow the part page.
When something breaks
| Symptom | Where to fix it |
|---|---|
| ModelDoc crashes when you open the hero | Part 2 |
| Strange bends when the hero moves | Part 1, weight painting |
| The camera sits in the middle of the screen | Part 3 |
| The health bar sits at the feet | Part 3 |
| The hero stands in an A-pose or does not turn | Part 4 |
| It broke after a game update | Update your mod after a game update |
More fixes are in Model and skin problems.
Next steps
Fit your character to the hero's skeleton and export DMX files for ModelDoc.
Credits
This guide is based on the work of these creators. Check out their original guides.
- Video: (Read Desc) Deadlock - General Model Swap Steps by Pugzilla.
- Video: Bat Drifter from Start to Finish: Part 1 - Make it exist first, make it pretty later by Basilisken.
- Guide: From Start to Finish (Fuji's Asset Replacement Guide) by Fuji.
- Guide: How to Model Replace for Dummies + Blender Steps by Axelliax.
- Guide: Neutral's General Guide for Modding Deadlock (Models, Textures, Sounds) by Neutraldrift.