
CS2 Workshop Tools for hero models
Why hero model swaps need Counter-Strike 2's free Workshop Tools, how to get them on Steam, and how to move files between them and CSDK 12.
Valve's official creator tools for Counter-Strike 2. They compile the AnimGraph 2 references that CSDK 12 cannot.
Counter-Strike 2 Workshop Tools are Valve's free creator tools for CS2. Deadlock creators use them for one job: the final compile of a hero model. You only need them for a hero model swap and some animation work.
What you need

Build your hero model addon in CSDK 12 up to the final compile. Source 2 Viewer reads values from the original model. The tools run on Windows only, and you need Counter-Strike 2 in your Steam library.
Why CSDK 12 is not enough
Almost every Deadlock hero animates with AnimGraph 2 (AG2). Your hero model must point to the hero's original AG2 skeleton and animation graphs. Without these references, the hero stands in an A-pose or does not turn with the camera.
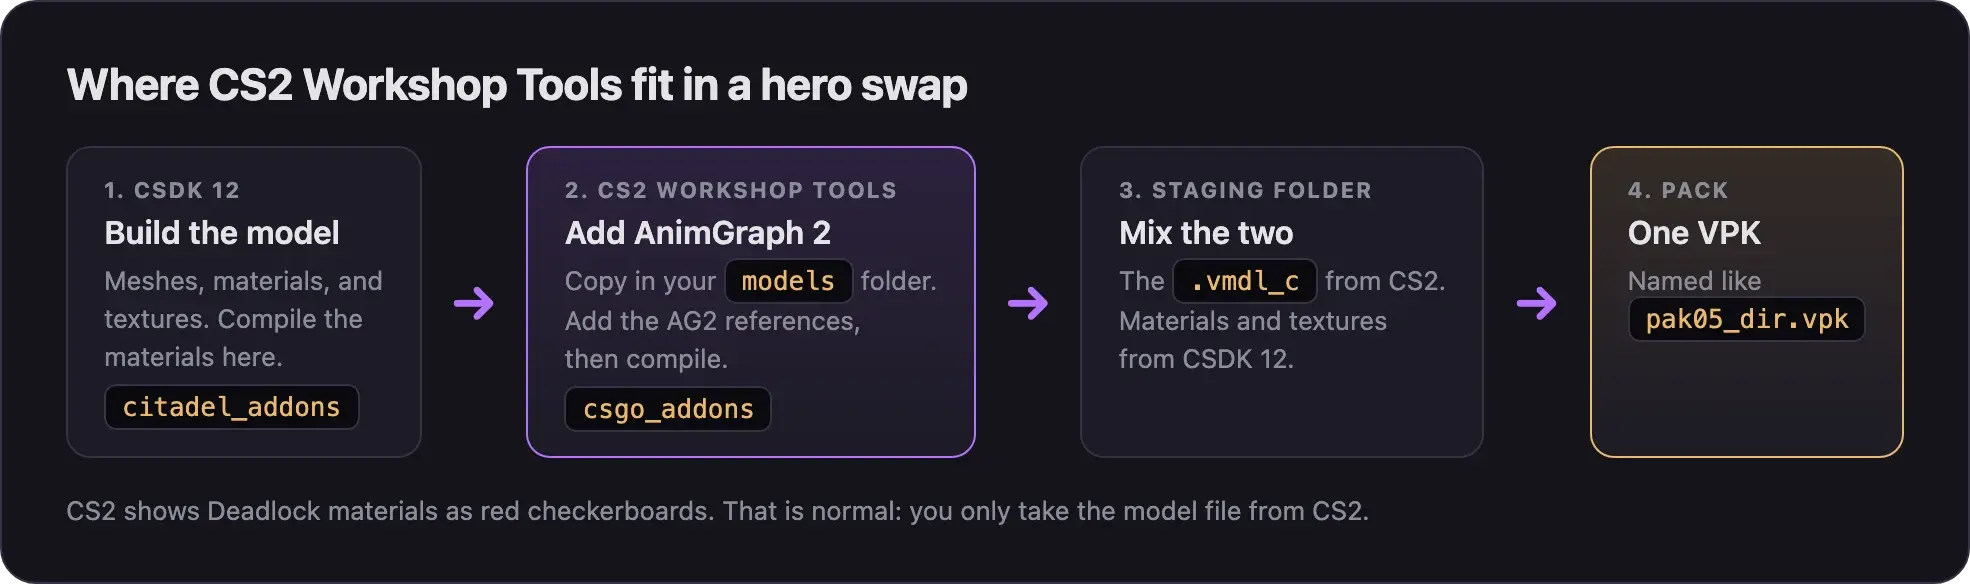
CSDK 12 cannot compile these references into a model. CS2 Workshop Tools can. So you build the model in CSDK 12, then do the last compile in CS2.
The Deadlock Modding Notes animation guide also uses CS2 tools for animation clips. CSDK 12 has no AG2 Clip Viewer, and it writes clips in an older format.
Valve made these tools for Counter-Strike 2, not for Deadlock. Deadlock has no official SDK, and Valve does not support Deadlock mods.
Get the tools from Steam
- Add Counter-Strike 2 to your Steam library. The CS2 on Steam button at the top opens its store page.
- Install Counter-Strike 2 Workshop Tools. The Install steps button at the top opens Valve's page with the steps.
- Start Counter-Strike 2 Workshop Tools from your Steam library.
Neutral's guide says CS2 does not need to be fully downloaded for the tools to start. This may differ on your PC.
Some guides link a repack called CSwin64 instead. It is a copy of Valve's tools on Google Drive from an unknown uploader, so we do not link it. Use the official tools from Steam.
Do the final compile in CS2
Move your model into a CS2 addon
CS2 Workshop Tools keep their addons inside your Counter-Strike 2 install folder. Like CSDK 12, each addon has two folders:
| Folder | What goes there |
|---|---|
content/csgo_addons/<addon>/ | Source files you copy in from CSDK 12 |
game/csgo_addons/<addon>/ | Compiled files, including your .vmdl_c |
- Close CSDK 12.
- Start CS2 Workshop Tools and create a new addon. Give it the same name as your CSDK 12 addon.
- Open your CSDK 12 content folder:
Reduced_CSDK_12/content/citadel_addons/<addon>/. - Copy its
modelsfolder into the CS2 addon's content folder. Keep the same folder structure. - Launch the tools for your CS2 addon.
- Open your hero's
.vmdlin ModelDoc.
Add AnimGraph 2 and compile
In ModelDoc you add the AG2 skeleton and graph references, then compile. Hero swap part 4, in Next steps, lists the nodes and where to find each value.
Take only the model back
CS2 does not have Deadlock's shaders, so it cannot build your materials. Your mod mixes files from both tools.
- Compile the model in CS2 Workshop Tools.
- Open the CS2 addon's game folder:
game/csgo_addons/<addon>/. - Copy only the compiled
.vmdl_c. - Build your staging folder from CSDK 12's game folder, as in Pack your mod into a VPK.
- Delete the CSDK 12
.vmdl_cin the staging folder. - Paste the
.vmdl_cfrom CS2 in its place. Check that it has the original model's file name, as Source 2 Viewer shows it. - Pack the staging folder.
Red checkerboards are normal
CS2 Workshop Tools show Deadlock materials as red checkerboards. CS2's shaders differ from Deadlock's. You may also see an error when you open the model. Ignore both, and compile your materials and textures in CSDK 12 only.
Other ways
- DeadlockTools (community tool, unofficial) writes the AG2 references into a model you already compiled in CSDK 12. Then you skip CS2 entirely. Its author warns that its file-writing features are experimental. Helper tools and scripts covers it.
- Dota 2 Workshop Tools are named in some guides as another option. No guide we found shows the steps, so this wiki uses CS2.
Common problems
Anything else wrong with the model? See Model and skin problems.
Next steps
Uses these tools step by step, then packs and tests your finished skin.
Credits
This guide is based on the work of these creators. Check out their original guides.
- Guide: Neutral's General Guide for Modding Deadlock by Neutraldrift.
- Guide: How to Model Replace for Dummies + Blender Steps by Axelliax.
- Video: (Read Desc) Deadlock - General Model Swap Steps by Pugzilla.
- Guide: Custom animation VmClip guide from Deadlock Modding Notes.
- Tool: Counter-Strike 2 Workshop Tools by Valve.
- Tool: DeadlockTools by dotryen.