
Make a new particle effect
Build a new effect in the Particle Editor and use it in place of an existing one. For creators who already know particle recolors.
Build your own particle effect in CSDK 12's Particle Editor, then show it in place of an effect the game already plays. Do Recolor ability effects first. This page assumes you can decompile, compile, and pack a particle.
What you need

CSDK 12 has the Particle Editor to build the effect, and the compiler. Source 2 Viewer previews and decompiles the game effect you replace. The recolor guide shows how to find that effect's path with dumpparticlelist.
Keep it fair
You see your effect every time any player triggers it, enemies included. Players read these effects to dodge and react.
Keep your effect about as big, as bright, and as long as the original. Never replace an effect with nothing, make it smaller, or make it fade early. Never make it harder to read in a fight. Read What's allowed and how to stay safe.
Your effect must also work without game data changes. If it only works with an edited scripts/*.vdata_c file, it is a gameplay mod. The method on this page changes particle files only.
Watch the walkthrough
Basilisken builds a burst from scratch and puts it on a weapon. The video is long and improvised, and some fixes happen off-mic. It was made before the September 2026 update, so its game file paths may be out of date. This page follows the same steps in order.
How a particle system works
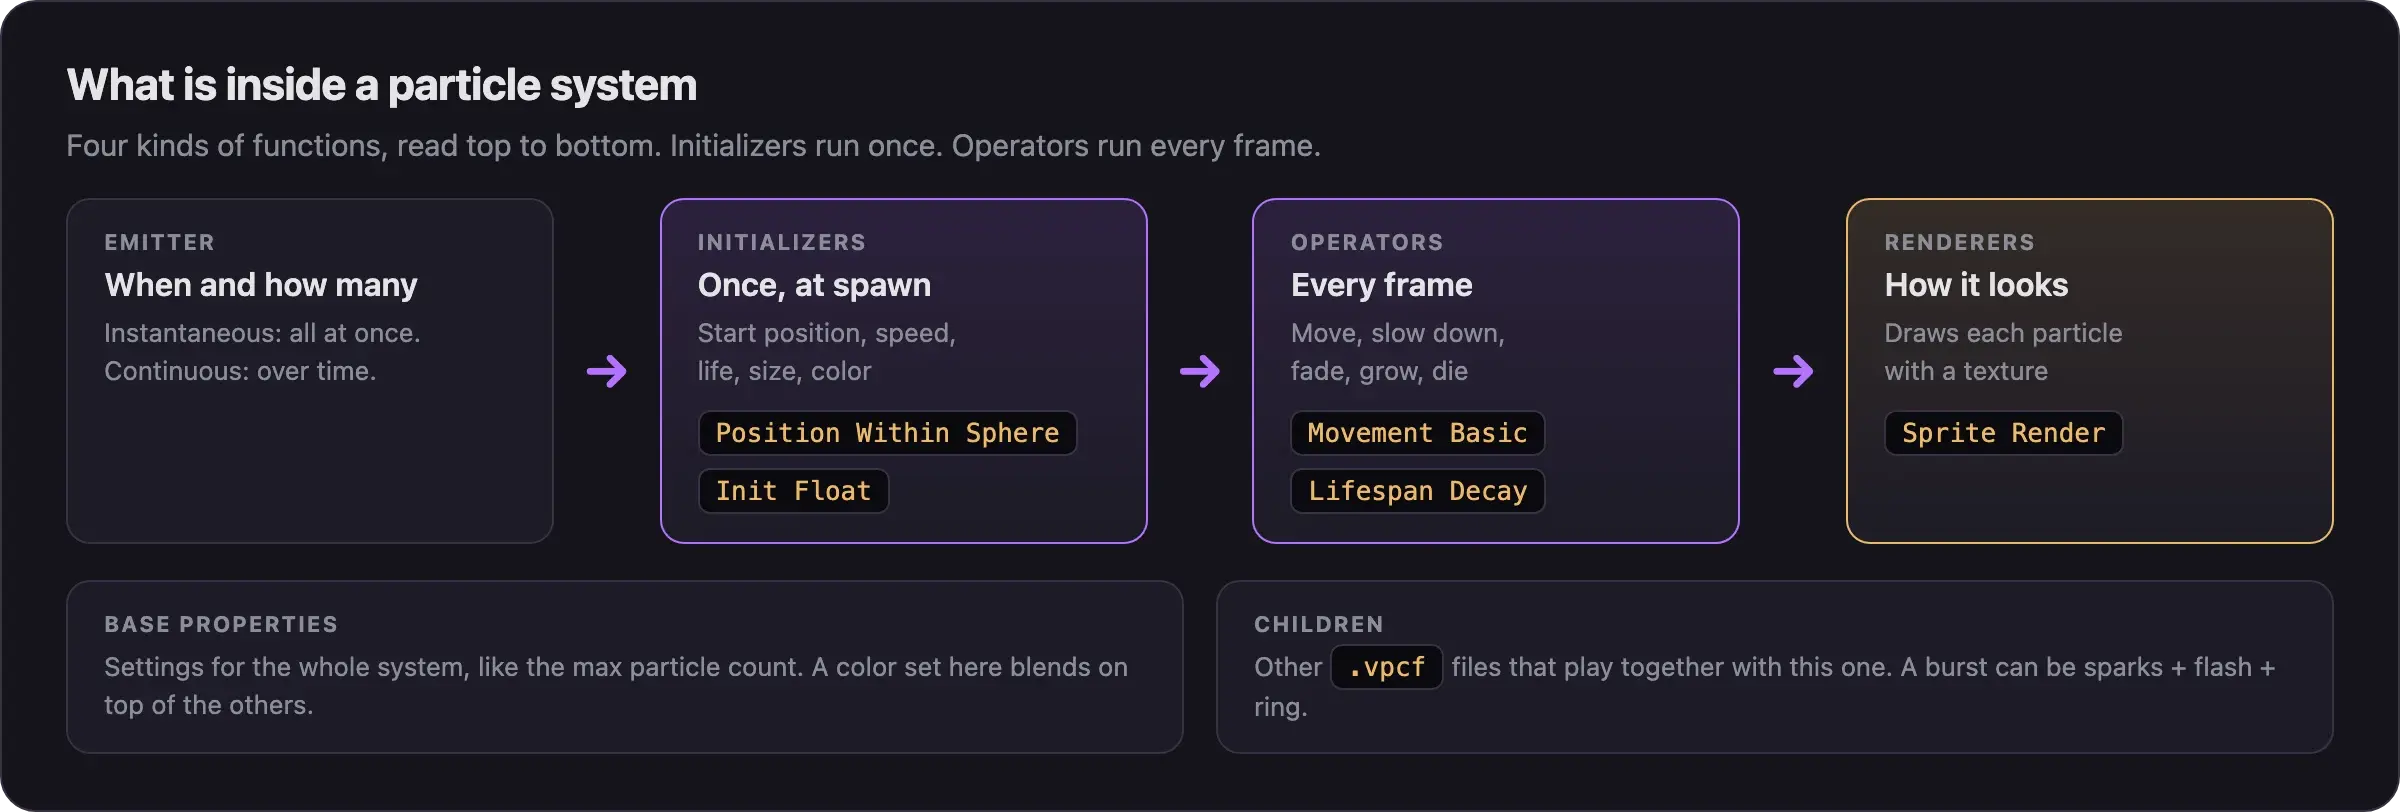
A particle effect is a .vpcf file. It holds a list of functions that run from top to bottom. Initializers set a value once, when a particle spawns. Anything that changes over time needs an operator.
Plan the effect
Decide three things before you open the editor:
- Which effect it replaces. Pick one effect the game already plays. Your effect plays in its place.
- The size and length to match. Preview the original in Source 2 Viewer. Note how big it is and how long it lasts.
- The parts. Build each part as its own file, then join them as children. This page builds a burst from three parts: sparks, a flash, and a ring.
Build and ship the effect
Build the sparks
Node names below follow the video. If a name differs in your build, search the add menu for a close match.
- In the CSDK 12 launcher, select your addon and click Launch Tools.
- Open the Particle Editor from the tools bar (the fire icon). Create a new particle system.
- Save it right away inside your addon, for example as
particles/my_effects/burst_sparks.vpcf. The preview stays empty until you save. - Set the emitter to instantaneous. It spawns every particle at once, which suits a burst. A continuous emitter spawns them over time.
- Lower the emit count to about 20.
- Add the initializer Position Within Sphere. Its distance sets the size of the sphere. Set speed min to 100 and max to 200, so particles fly out evenly.
- Add the renderer Sprite Render. It draws each particle as a flat card with a soft dot.
- Add the operator Lifespan Decay. Without it you get the warning "system will not end on stop", and particles never clear.
- Add an Init Float initializer. Change its output from radius to life duration and set it to 2 seconds.
- Add the operator Movement Basic so particles move. Set its drag between 3 and 8, so they shoot out and then slow down.
- In the sprite renderer, pick a sparkle texture from the built-in list.
- Add the initializer Color Random for the start color. Add the operator Color Fade to fade to a second color near the end of life.
Shape it over time
| To get | Do this |
|---|---|
| Random sizes | Click the value-type button next to the radius and choose random uniform. Set a range such as 5 to 10. |
| Grow or shrink | Add the operator Radius Scale with a start and an end scale. The radius you set at spawn is the base size, and this operator multiplies it. |
| Curves | For size or fade over a particle's life, use a float node with the input particle age (0 to 1). Switch it to a curve and Shift+click to add points. |
| Keep random sizes | If a curve wipes out your random radius, change its set value method to scale initial value. |
| Layers | Duplicate the sprite renderer and give the copy another texture. |
Add a flash and a ring as children
- Save a copy of the sparks file as
burst_flash.vpcf. - In the copy, remove the movement functions and set the spawn distance to 0. The flash now sits in the center.
- Pick a flare texture.
- If the texture shows a black box, change the sprite's blend mode from alpha blend to additive.
- Add a fast fade with an alpha curve, so the flash does not linger.
- Save another copy as
burst_ring.vpcf. Pick a ring texture. Animate its radius with a curve, so it grows and fades. - Open
burst_sparks.vpcfand add the flash and the ring under Children. All three now play together.
A color set in Base Properties blends on top of the color functions. Check there if the colors look wrong.
Preview and tune
- Restart the effect in the preview after each change.
- Compare it with the original effect. Match the size, the brightness, and the length.
- Save all three files.
Use it in place of a game effect
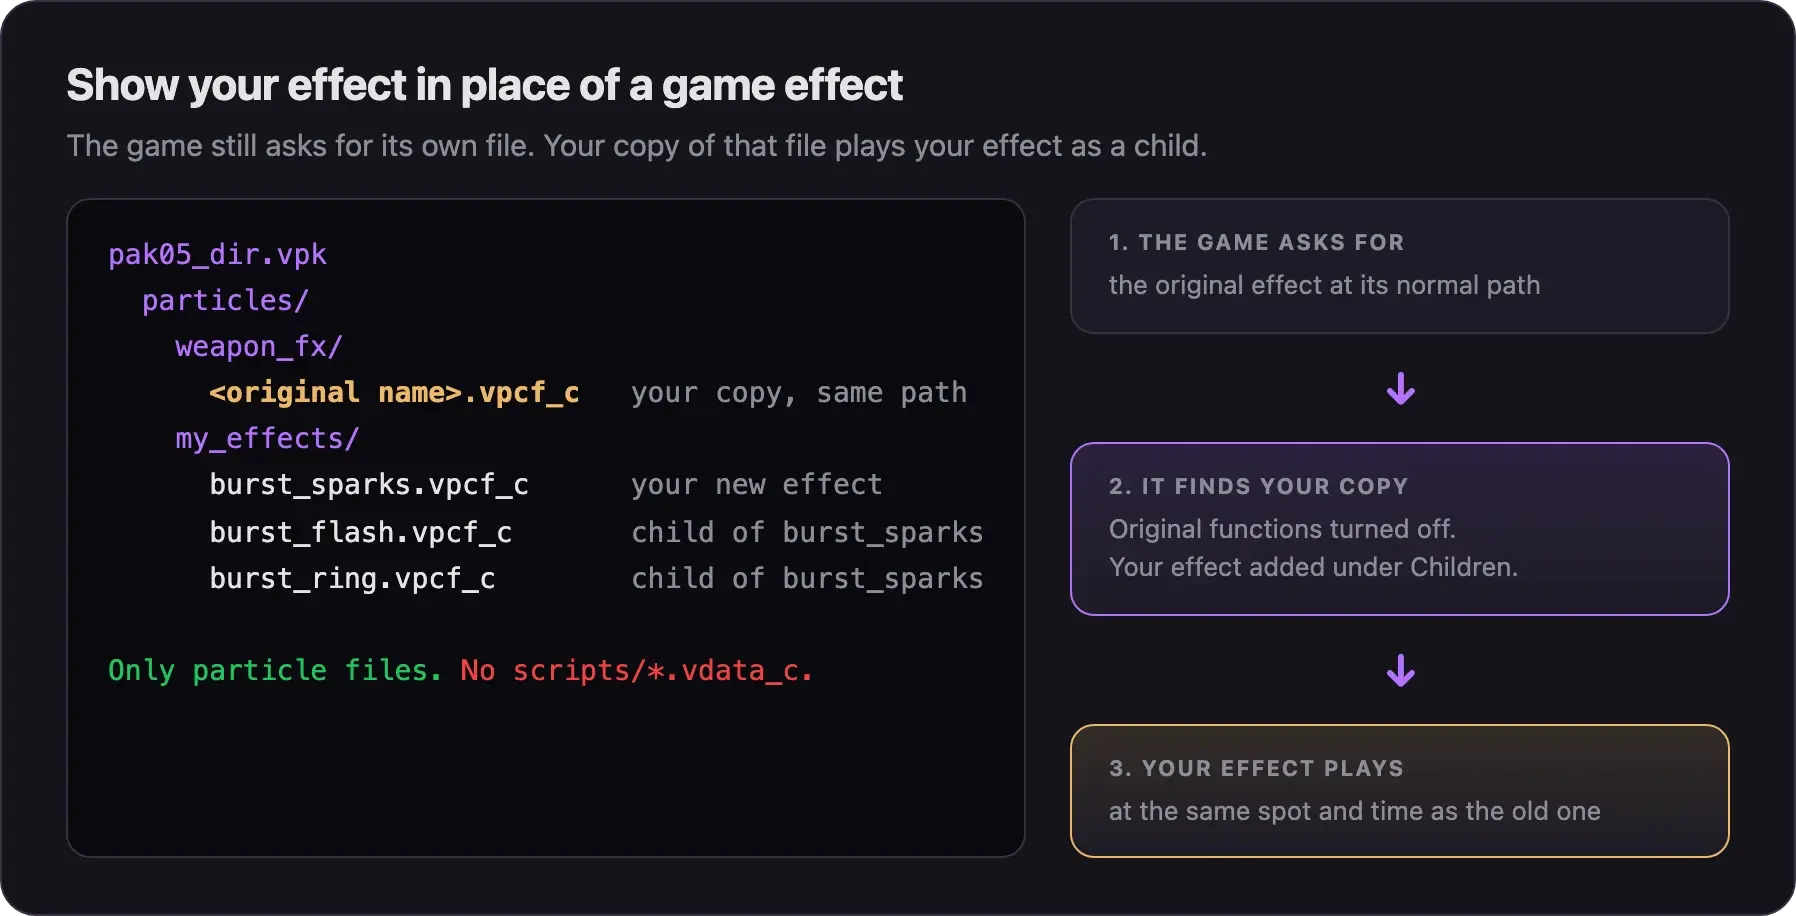
The game asks for each effect by its path. A brand new path would need a game data change. Instead, you edit a copy of the original effect so it plays yours as a child.
- Find the game effect you want to replace. Weapon effects, such as muzzle flashes, live in
particles/weapon_fx/. - Decompile it into your addon at the exact same path.
- If it will not open in the tools, fix its header line, as the recolor guide shows.
- Open it in the Particle Editor. Add
burst_sparks.vpcfunder Children. Your file can stay in its own folder. - Turn off the original functions, so only your effect shows.
- Scale your effect to the original's size.
- Remove any fixed direction from your effect's speed. The point an effect attaches to has its own axes, so "up" in your file can point sideways in game.
- Save the file.
Your effect stays where it spawns. Making it follow a moving weapon needs control point functions, and no Deadlock guide covers them yet.
Compile, pack, and test
- In the Asset Browser, select your three files and the edited game effect.
- Right-click and choose Recompile, then Full.
- Open your addon's game folder. Copy the
particlesfolder into a staging folder, so the paths stay the same. - Remove any compiled file you did not make or change.
- Built-in textures are already in the game. If you made your own texture, add its compiled
.vtex_cat its path too. - Pack the staging folder. Follow Pack your mod into a VPK.
- Play the hero or weapon that uses the effect. Follow Test your mod in game.
Common problems
Only one Deadlock tutorial builds an effect from scratch. Nobody has documented how to make an effect follow a moving attachment, how team colors work on a new effect, or which effects City Never Sleeps moved.
Next steps
Divine is adding Deadlock mods. When they arrive, you'll publish yours from the Creator Panel.
Credits
This guide is based on the work of these creators. Check out their original guides.
- Video: How to: Particles - Making a VFX burst (Deadlock) by Basilisken.
- Guide: Particle Editor (Source 2) on the Valve Developer Community.
- Guide: Simple Particle Recolor Tutorial by TheLastFriendly.