
Your first model swap: a soul container
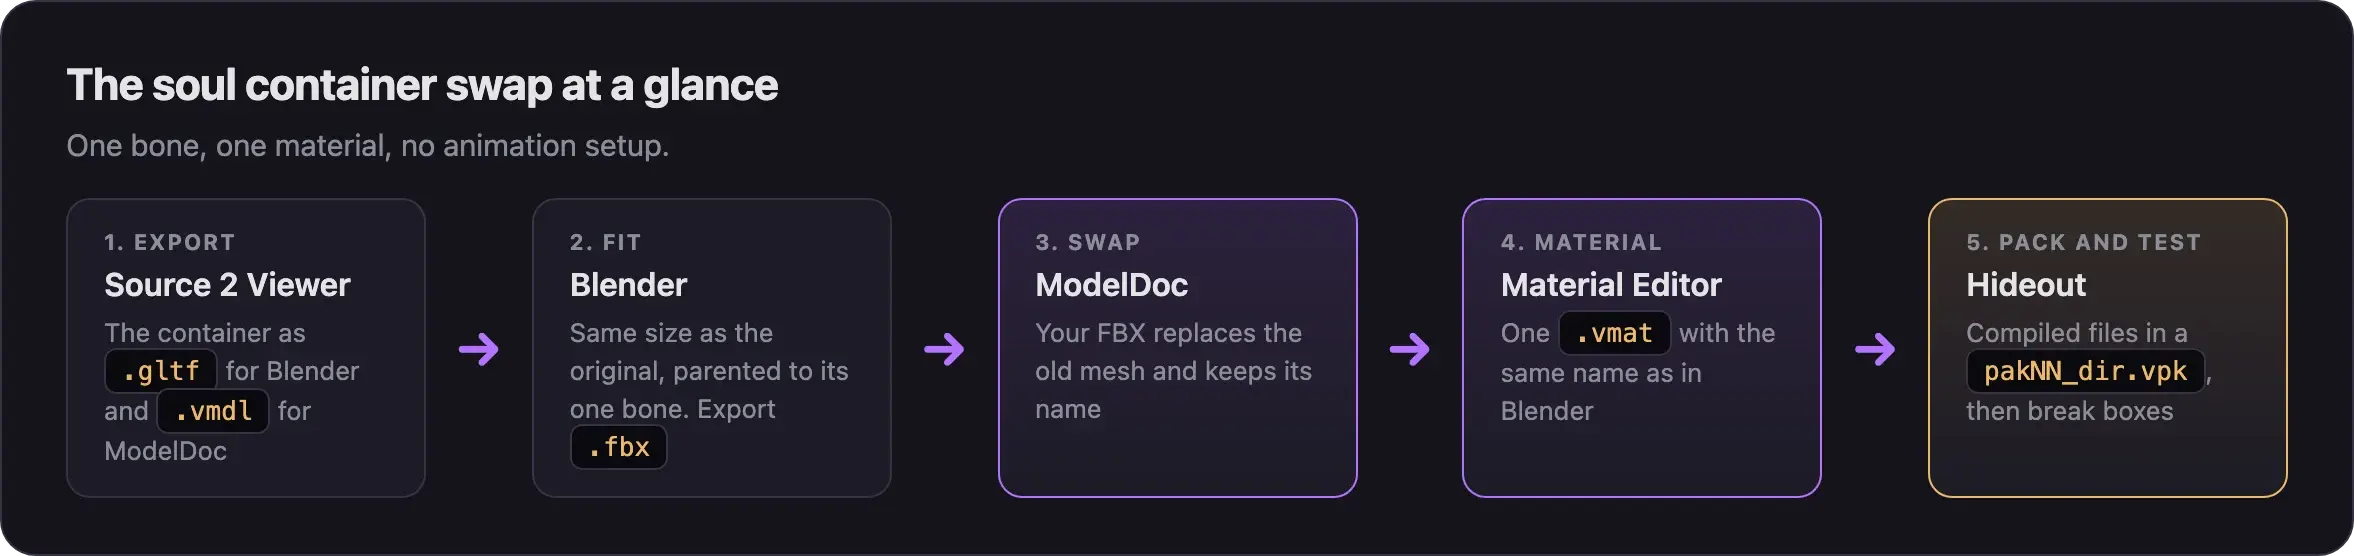
Replace the soul container with your own 3D model. The easiest model swap: one bone, one material, no animation setup.
Swap the soul container for your own 3D model. It is the easiest model swap: one bone, one material, and nothing to animate.
What you need

Source 2 Viewer
CSDK 12
Blender
any recent versionYour own 3D modelColor texture as PNG
normal map optionalSource 2 Viewer exports the original soul container. ModelDoc and the Material Editor in CSDK 12 build your new model. Blender needs no add-on, because this guide exports FBX.
Install Source 2 Viewer and CSDK 12 with Set up your creator tools. If Blender imports are new to you, read Import a Deadlock model into Blender.
Use your own design. Models ported from other games, films, or anime carry copyright risk.
Why start with a prop
- The soul container has one bone and one material. There is no skeleton work, no attachments, and no CS2 Workshop Tools step.
- You learn ModelDoc and the Material Editor, which every hero swap uses.
- It is the most popular model swap. In October 2026, more than half of the model swaps creators shared replaced the soul container.
Keep it fair
Model size and shape are part of the fair-play line. A smaller, thinner, or taller model changes how easy it is to spot, and that is an advantage. Keep your container close to the original size and shape, and do not make it glow. Read What's allowed and how to stay safe.
Watch the walkthrough
Pugzilla's video follows the same steps as this guide.
Pugzilla recorded it in August 2026, before the City Never Sleeps update. We have not tested these steps on the current update yet, so menus may look different.
Make the swap
Export the original
- Make an empty work folder, for example
soulbox_work. - Open Source 2 Viewer and open
Deadlock/game/citadel/pak01_dir.vpk. - Go to
models/props/gameplay/soul_container/. This is the path from the video. If it moved, look throughmodels/props/. - Right-click the soul container's
.vmdl_cand choose Decompile & export. - Change Save as type to glTF. Save it into your work folder.
Fit your model in Blender
- Open Blender and delete the default scene objects.
- Choose File, then Import, then glTF 2.0. Tick Disable Bone Shape and import the soul container. You see the container and its one bone.
- Import your own model with File, then Import.
- Scale and move your model to match the container's size and position.
- Delete the original container mesh. Keep the armature.
- Click your mesh, then Shift-click the armature. Press Ctrl+P and choose With Automatic Weights.
- Test it. Select the armature, switch to Pose Mode, and move the bone. Your mesh should follow. Press Ctrl+Z to undo the move.
- Save the
.blendfile.
Name the material and export
- Select your mesh and open the Material tab.
- Check that every slot has a material assigned.
- Give each material a simple name: lowercase letters, no periods, no numbers, no
.001ending. This guide usessoulbox. - Choose File, then Export, then FBX and save it as
soulbox.fbx.
The material name links Blender to your material file later. FBX works for a prop with one bone. Hero swaps export DMX instead.
Set up the addon
- Open the CSDK 12 launcher and click Create New Addon. Name it
soulbox, in lowercase with no spaces. - Right-click the addon and choose Explore Content Folder.
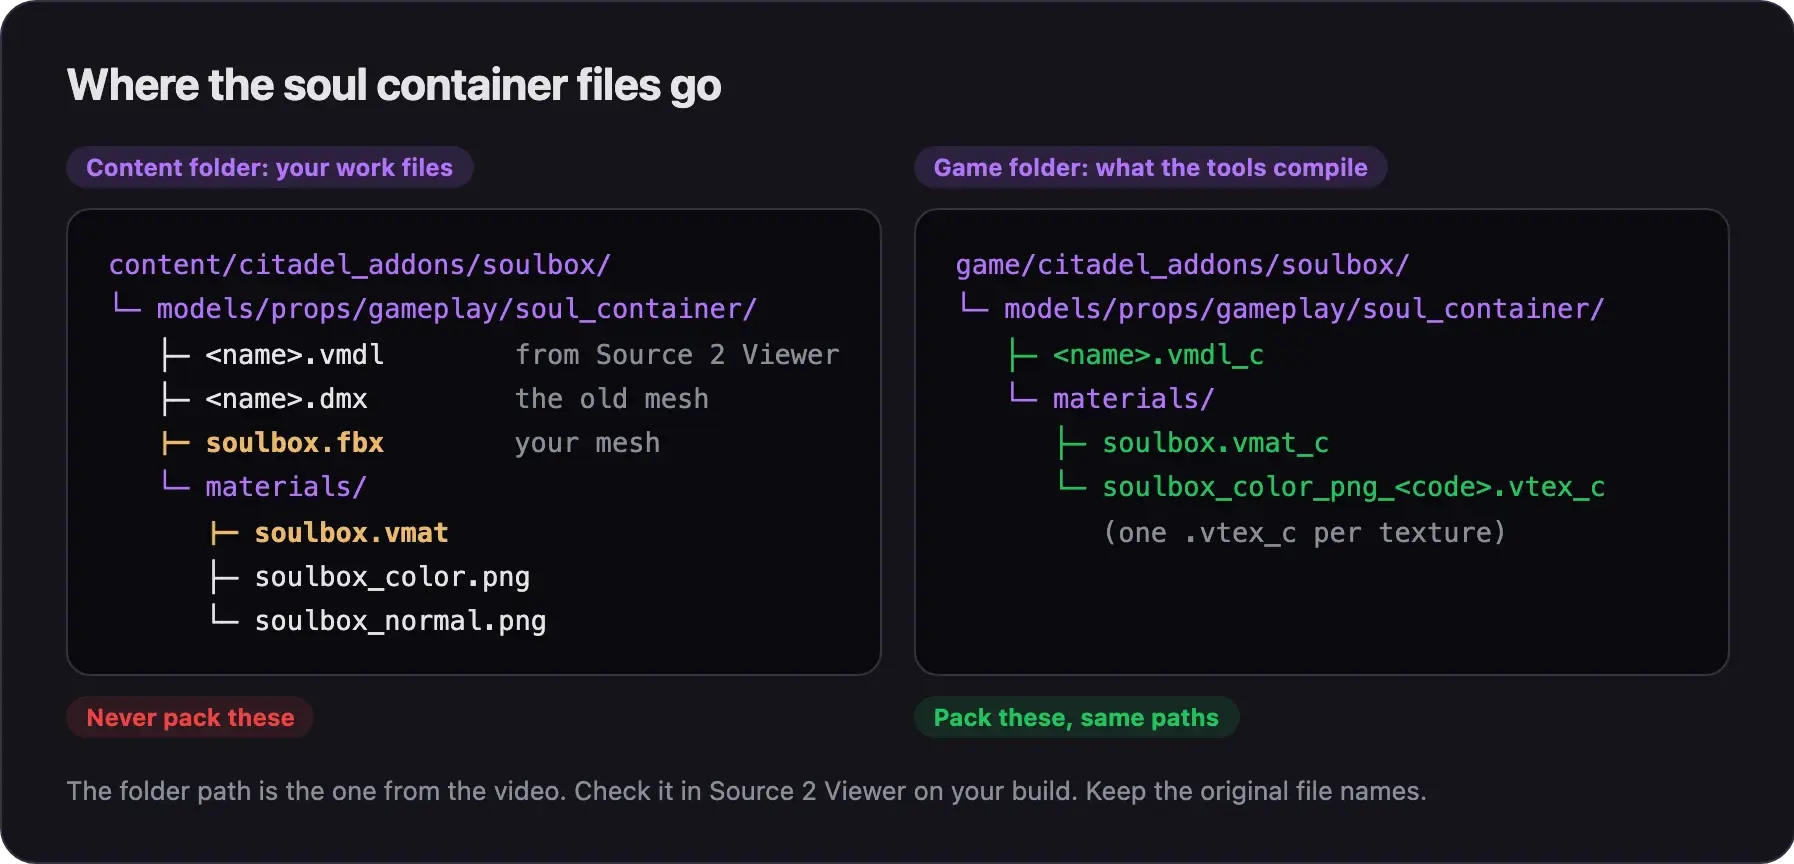
- Inside it, rebuild the game path:
models/props/gameplay/soul_container/. Make amaterialsfolder inside that folder. - In Source 2 Viewer, right-click the soul container's
.vmdl_cagain. Choose Decompile & export, keep the model type, and save into thesoul_containerfolder you made in step 3. - Check the folder. It now holds a
.vmdlfile and its.dmxmesh. - Copy
soulbox.fbxinto the same folder.
Swap the mesh in ModelDoc
- In the launcher, select
soulboxand click Launch Tools. The Asset Browser opens. - Double-click the soul container model. ModelDoc opens.
- Click the star next to Add and choose Add Meshes. Pick
soulbox.fbx. - Under RenderMeshList, click the original
.dmxmesh and copy its name. - Delete the original mesh. Paste the name onto your new FBX mesh.
- Click Compile. Your model replaces the container in the preview.
Keep the original mesh name so the rest of the model still finds it.
Make the material
- In ModelDoc, choose Add, then Default Material Group. A slot appears with your Blender material name. If the slot has no name, your Blender name is wrong. Rename it, export the FBX again, and compile.
- In the Asset Browser, open the Material Editor. Click New, then save right away into
materials/assoulbox.vmat. - Copy your PNG files into the same
materialsfolder. Name themsoulbox_color.pngandsoulbox_normal.png. These endings help the editor fill the right slots. - Check that the shader is
pbr.vfx. If it shows another shader, switch it topbr.vfx. - Tick Use NPR Lighting and Use Status Effects Proxy.
- Set Color to
soulbox_color.png. - Change Roughness to a color and pick pure white. White means no shine. The gray default looks like plastic.
- Save and close the Material Editor.
- In ModelDoc, click the browse button on the
soulboxslot. The video calls it open local browser. Picksoulboxand click Compile.
Materials for custom models explains every setting.
Compile, pack, and test
- Close ModelDoc. In the Asset Browser, right-click the model and recompile it.
- In the launcher, right-click
soulboxand choose Explore Game Folder. - Open
models/props/gameplay/soul_container/. You see the compiled.vmdl_cand amaterialsfolder with.vmat_cand.vtex_cfiles. - Copy the whole
soulboxgame folder somewhere else. In the copy, delete everything exceptmodels. - Pack the copy into a VPK. Follow Pack your mod into a VPK.
- Load the mod and type
map dl_hideoutin the console. Test your mod in game shows how. - Go to the practice range. Break boxes until a soul container appears.
Pack only compiled files. Leave out the .dmx, .fbx, .vmdl, .vmat, and PNG files.
Other props you can swap
Creators also swap hideout props, breakables, the Spirit Urn, and NPCs. The same steps work for any model that does not animate. Models with animations, like NPCs and heroes, need more work. For heroes, start with the hero model swap overview in Next steps.
The fair-play rule applies to every prop. Objectives like the Spirit Urn must stay as easy to see as the original, never easier or harder.
Common problems
Next steps
Put your own character on a hero. The whole path, the tools, and the rules.
Credits
This guide is based on the work of these creators. Check out their original guides.
- Video: Deadlock - Soul Container Model Swaps by Pugzilla.
- Video: (Read Desc) Deadlock - General Model Swap Steps by Pugzilla.
- Guide: CSDK 12 from Deadlock Modding Notes.
- Tool: Source 2 Viewer by the ValveResourceFormat team.