
Retexture a hero
Paint over a hero's textures, rebuild the material in CSDK 12, and ship the compiled files. Includes a Blender trick to find each part of the image.
Change how part of a hero looks by painting its texture images. Then CSDK 12 rebuilds the material, and you pack the compiled files. Do Recolor with material values first. It covers the Material Editor basics this page builds on.
What you need

Source 2 Viewer finds the hero's material and exports its images. CSDK 12 rebuilds the material with your painted images. Your image editor must keep transparency. Blender shows which part of the image paints which part of the hero.
Retexture or recolor?
A recolor changes material values, such as color, roughness, and metalness. You paint nothing. A retexture changes the images themselves, so you can add patterns, details, and several colors. For one new color or a metal finish, use Recolor with material values instead.
Keep it fair
You see your retexture on every player using that hero, enemies included. Nobody else sees it.
Keep the hero about as bright and as easy to see as the original. Do not paint a hero glowing, much brighter, near-transparent, or very dark. Do not remove outlines or a hero's stealth look. Read What's allowed and how to stay safe.
Paint and rebuild
Pick a route. The full workflow rebuilds the material with CSDK 12. The quick option builds a texture mod in your browser.
This video by Pugzilla recolors Lady Geist's clothes from start to finish.
The video is from October 2025. The CSDK 12 launcher looks different now. At the end, it ships one renamed texture. That is route B in Which files to ship.
Find the material and its images
- Open Source 2 Viewer.
- Open
Deadlock/game/citadel/pak01_dir.vpk. - Find the hero's model in
models/heroes_wip/ormodels/heroes_staging/. Look up the codename in Hero names and file paths. - Open the model and check its References tab. It lists the materials (
.vmat) the model uses. - Open the material for the part you want to change. Write down its full path.
- Find the material's color texture: a
.vtex_cfile withcolorin its name. Double-click it and note its size, such as 2048 x 2048. Your image must keep that size.
Decompile it into your addon
- In the CSDK 12 launcher, create a new addon. Name it in lowercase with no spaces, such as
myretexture. - Right-click the addon and choose Explore Content Folder.
- Inside it, rebuild the material's folder path.
- In Source 2 Viewer, right-click the material (
.vmat_c) and choose Decompile & export. - Save it into the folder you made in step 3.
You get the .vmat file and its images as PNG files. Paint only the color image, the one with color in its name. The normal, roughness, and mask images hold shape and shine data. Leave them alone. Hero material settings reference explains each one.
Find which part of the image is which
This step is optional. One image often covers parts you do not expect. On Lady Geist, the head image also covers an arm, and the clothes image covers the legs. Blender shows you which area paints which part.
- In Source 2 Viewer, right-click the hero's model (
.vmdl_c) and choose Decompile & export. Pick glTF and save it to a work folder outside your addon. - In Blender, choose File, then Import, then glTF 2.0 and open the file.
- Delete the extra helper objects, such as the icosphere. Select the large bones and press H to hide them.
- Select the hero mesh and press Tab for Edit Mode.
- Open the Material Properties tab. Click a material and click Select.
- Right-click and choose Separate, then Selection. Repeat for each material you want to see on its own.
- Switch to the UV Editing workspace. In the image list, pick that part's texture.
- Turn on UV Sync Selection. Select faces on the model. Their area lights up on the image.
Use what you see as a map. In your image editor, cut that area onto its own layer. Areas that never light up are unused, so paint there does not show in game.
Blender is only for looking here. It does not change the files you ship.
Paint the image
- Open the color PNG in your image editor.
- Paint your changes. Keep the image at its exact size.
- Keep any transparency. In GIMP, tick Save color values from transparent pixels when you export, or see-through areas turn black.
- Save the result over the decompiled color PNG, with the same name.
Exported game textures lose a little quality with each save. Keep a layered file (.xcf or .psd) and export a fresh PNG from it each time.
Sizes must be a power of two, such as 512, 1024, or 2048. Other sizes can fail to compile or look blurry.
Rebuild the material
- In the CSDK 12 launcher, select your addon and click Launch Tools.
- In the Asset Browser, find your material. Double-click it to open the Material Editor. Recolor with material values shows how to filter the list.
- Check that the shader at the top is
pbr.vfx. - Look at each texture slot. A purple checkerboard means the slot lost its image.
- For each checkerboard slot, click the magnifier and pick your PNG for that slot.
- Press Ctrl+S to save. Check the result on the hero in the preview.
- In the Asset Browser, right-click the material and choose Recompile, then Full.
- Right-click your addon in the launcher and choose Explore Game Folder. Open the material's folder. You see a new
.vmat_cand new.vtex_cfiles.
Then pick which files to ship, below.
DeadMod builds a texture mod in your browser. You do not need CSDK 12. It puts your edited image at the texture's exact game path.
- In Source 2 Viewer, find the texture (
.vtex_c) you want to change. - Right-click it and choose Decompile & export. Save it as a PNG.
- Paint over the PNG. Keep its size and transparency.
- Open DeadMod.
- Add the texture's game path. Type it in the file path box. Or click Upload VPK, pick the game's
pak01_dir.vpk, and search for the file. - Click Choose file and pick your edited PNG.
- Check Mod file name (it starts as
pak50_dir.vpk), then click Save mod as VPK. - Load it in game and check your hero, as in Pack and test below.
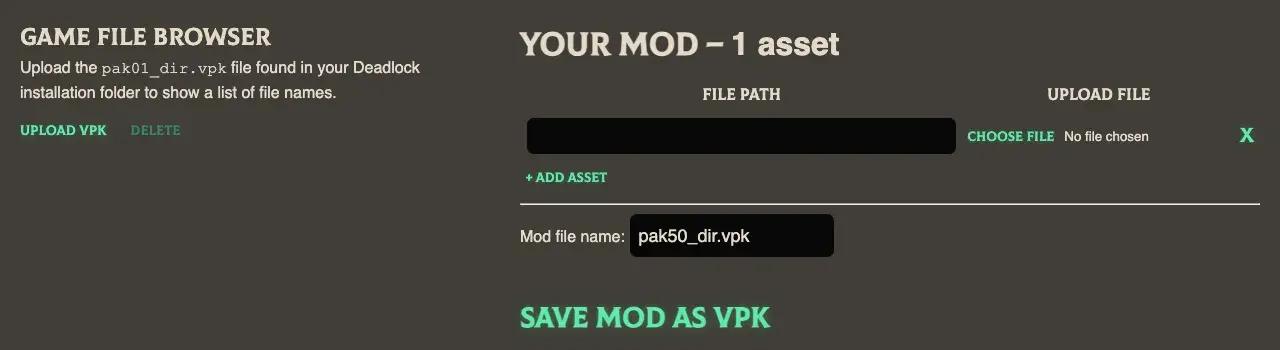
DeadMod's author shows the whole flow in DeadMod: Make new Deadlock texture mods in minutes. More browser tools are in Make mods without installing tools.
Which files to ship
This part is for the CSDK 12 workflow. Each compiled texture has a code in its name, such as abrams_coat_color_png_63291cfb.vtex_c. Your compile makes a new code. So you have two ways to ship your work.
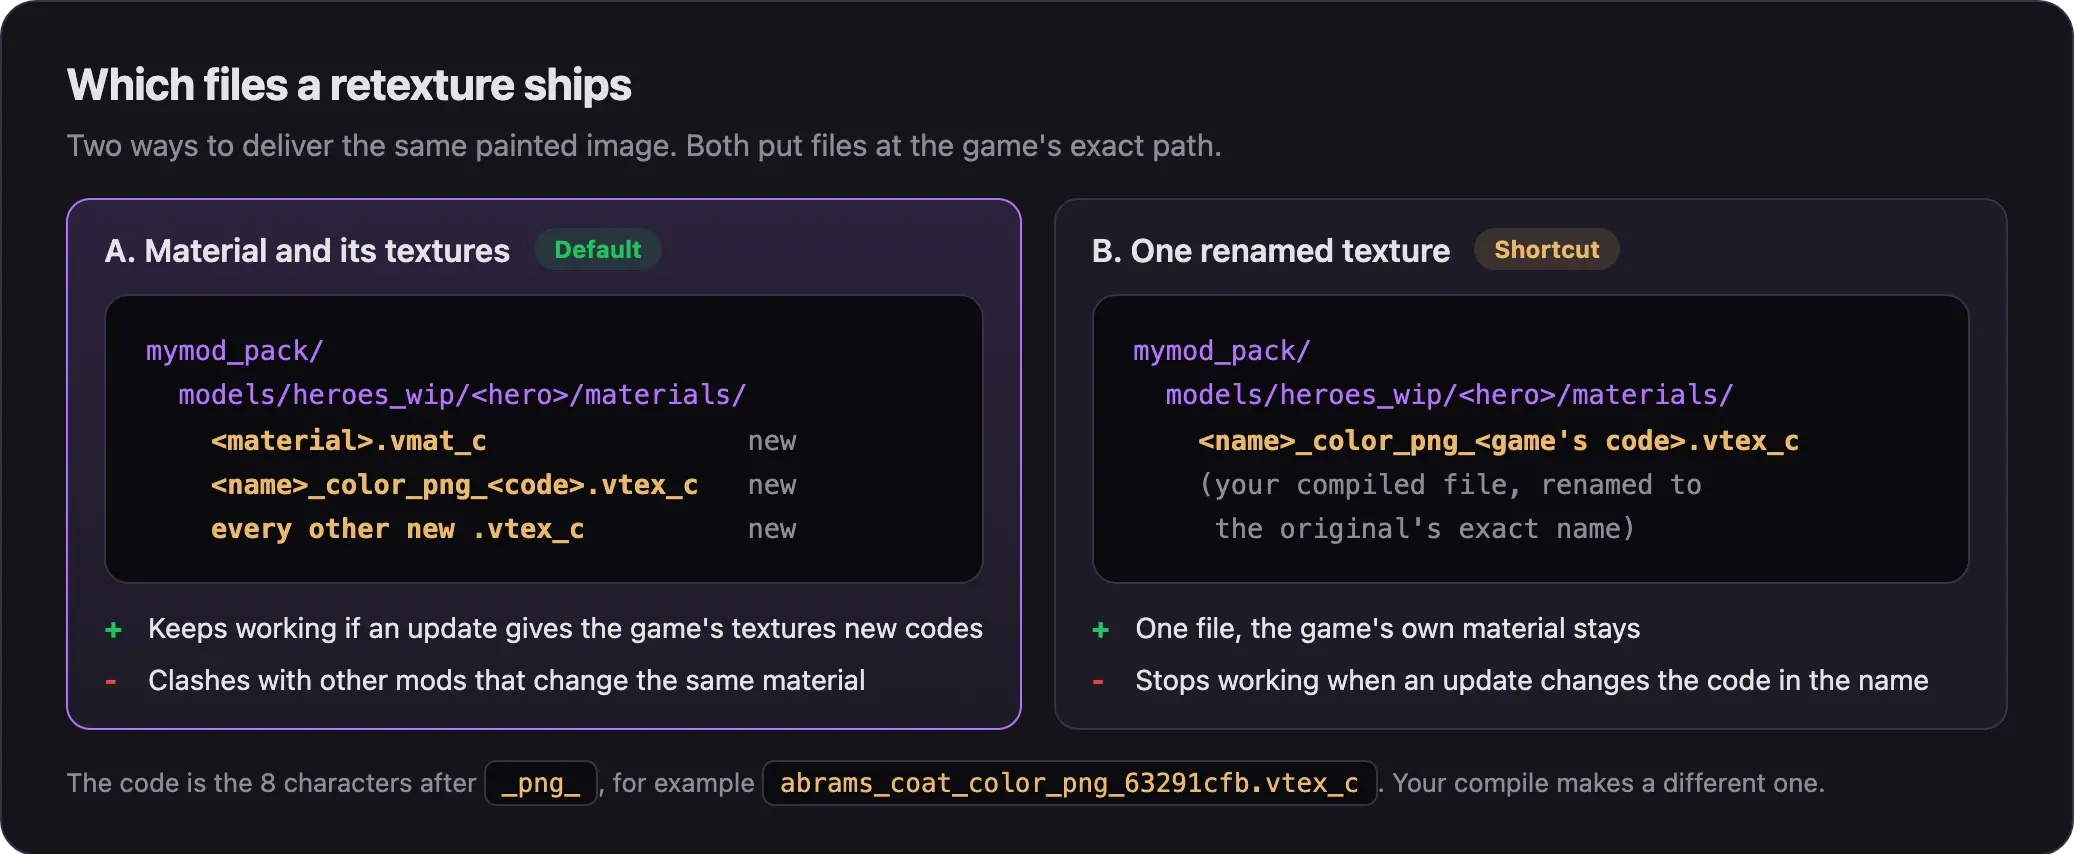
- Make a staging folder, such as
myretexture_pack. - Inside it, rebuild the material's folder path.
- Copy the new
.vmat_cand every new.vtex_cfrom the addon's game folder into it.
The new material points to its textures by their new names. If one is missing, the game shows a checkerboard.
- In Source 2 Viewer, find the game's original color texture for this material. Write down its full name, with the code.
- Make a staging folder and rebuild the texture's folder path inside it.
- Copy only your compiled color
.vtex_cinto it. - Rename it to the original's exact name.
The game's own material then loads your texture. When an update changes the code in the name, your mod stops working. Rename it again to the new name.
Pack and test
- Pack your staging folder with Pack your mod into a VPK.
- Load it and look at your hero from every side. Follow Test your mod in game.
Always check in game. The preview in Source 2 Viewer does not show Deadlock's lighting exactly.
Common problems
Next steps
Build new materials for your own model, with the settings Deadlock heroes need.
Credits
This guide is based on the work of these creators. Check out their original guides.
- Video: (Read Desc) Deadlock - Hero Texture Replacement Tutorial by Pugzilla.
- Video: Deadlock - Finding Specific Parts of Materials For Retextures by Pugzilla.
- Video: DeadMod: Make new Deadlock texture mods in minutes by Red Mser.
- Guide: Neutral's General Guide for Modding Deadlock (Models, Textures, Sounds) by Neutraldrift.
- Docs: Format Support and Export Fidelity from the Source 2 Viewer docs.
- Data: GameTracking-Deadlock by SteamTracking, for texture names and shader settings.