
Animation clips in ModelDoc
The full-control route for animation mods: build clips in ModelDoc, copy events, set up aim clips, and match the hero's IK chains.
This is the full-control route for animation mods. You build the clip in ModelDoc instead of editing the .vnmclip by hand. Then you fix its events, aim settings, and IK chains. Do Replace an animation first. This page starts where its Blender steps end.
This page comes from one written guide from September 2026. We have not tested it after the City Never Sleeps update, which broke several popular animation mods. Expect a few rounds of trial and error.
When you need this route
The simple route points the original .vnmclip at your new DMX file. Use the ModelDoc route when you need one of these:
- ModelDoc's Clip preview, to check the clip before you go in game.
- The original clip's ID events in your new clip.
- An aim clip, which is additive.
- The hero's IK chains, because limbs flip or break in game.
Neither route adds new moves. You can only replace a clip the hero already has. No public tool can edit AnimGraph 2 graphs.
You see your clip on enemies who play this hero too. Keep attack wind-ups (parry, heavy melee, ultimates) as easy to read as the original: not shorter, not longer, and not more obvious.
What you need
CS2 Workshop Tools
Blender and add-ons
4.5 or newer
Source 2 Viewer
latest dev buildYour baked animationCS2 Workshop Tools are free with Counter-Strike 2 on Steam. Their ModelDoc has the AnimGraph 2 Clip preview. CSDK 12 lacks it and compiles clips in an older format. In Blender, use the PulseSrcOps add-on, the one the guide names for DMX animations in Blender 4.5 and newer. Make and bake your animation in Blender as shown in the simple route.
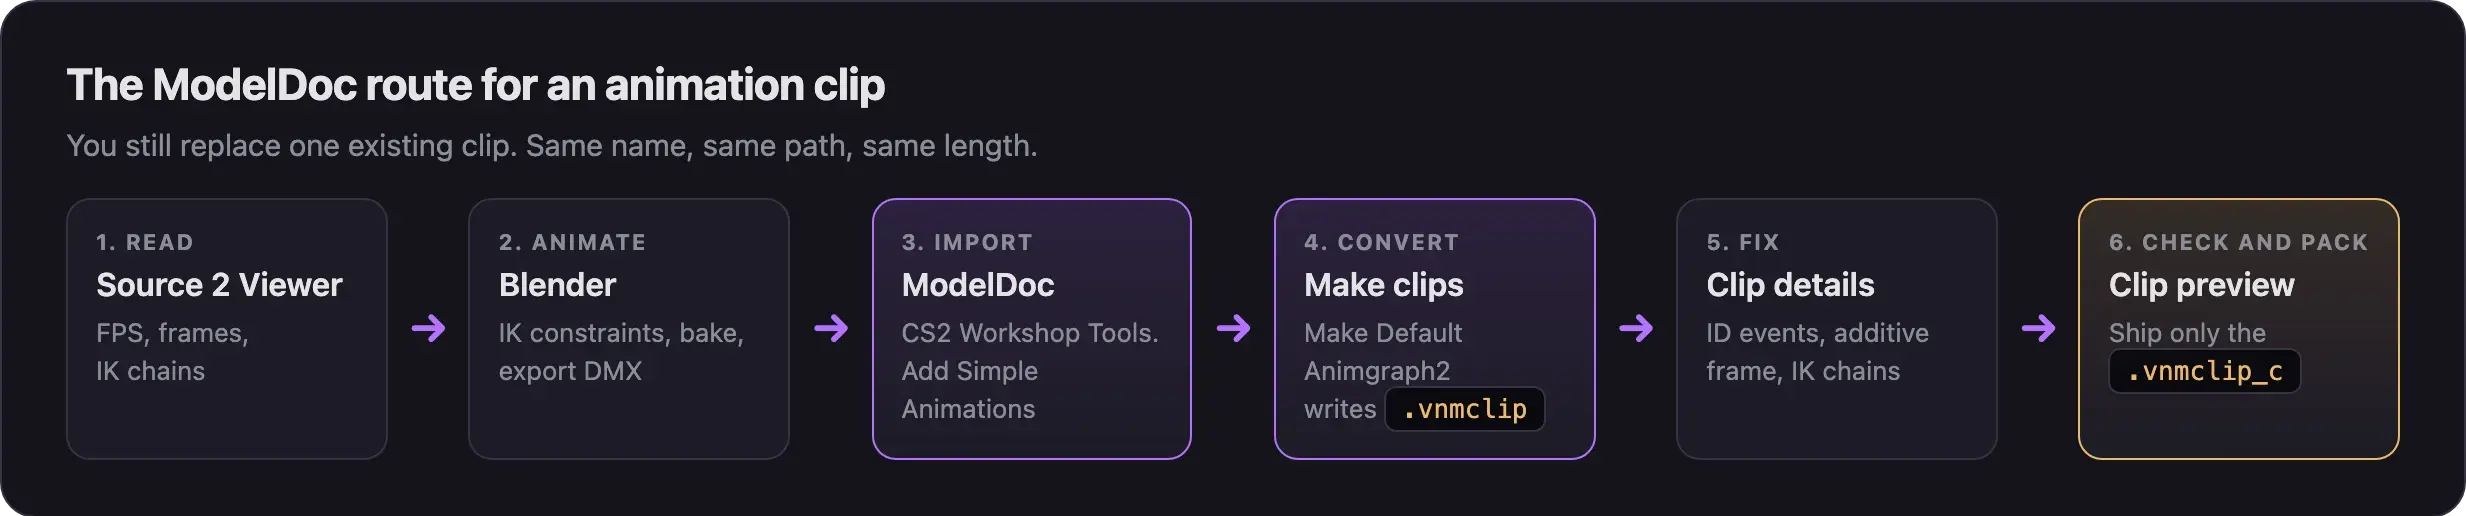
Build the clip in ModelDoc
Read the original clip
- Open the hero's
clipsfolder in Source 2 Viewer, the same one you used in the simple route. - Select the clip you will replace and preview it.
- In the Data section, write down FPS, DURATION, and FRAME.
- Open the hero's model and go to Data, then IKChains. For each chain, write down its name (
m_Name), its end bone, its bone count, and its target bone. - Decompile the original clip. Keep the
.vnmclip, because you copy events from it later.
Check your Blender export
The Blender steps live in the simple route. Before you export, check these:
- The scene frame rate matches the clip's FPS, rounded to a whole number.
- The frame count matches the original.
- The IK bones follow the real limbs with Copy Location and Copy Rotation constraints, and the animation is baked.
Root_motionhas no keys, unless the move needs to travel.- The DMX export uses Binary 9 and Model 22.
To start from the original motion, import the original clip's DMX with PulseSrcOps.
Import the clips in ModelDoc
- In CS2 Workshop Tools, create an addon.
- In its content folder, rebuild the hero's skeleton path, the same path you used in CSDK 12.
- Decompile the hero's
.vnmskelinto that folder. - Put your DMX files in a
clipsfolder next to it. - Open ModelDoc and choose Add, then Add Simple Animations. Import your DMX files.
- Set each animation's frame count and frame rate to the original values.
- Delete any
NMSkeletonListorAnimGraph2Listnodes.
If you skip step 7, you get the warning "Found existing (default) AG2 graph. Ignoring requested creation."
Make the clips
- Choose Tools, then Make Default Animgraph2.
- Pick the hero's
.vnmskel. - Tick Convert Anim Sequences to Clips.
- Run it. ModelDoc writes one
.vnmclipfor each animation. It does not make a working graph, and you do not need one. - Rename your clip to the exact name of the clip it replaces.
Older sound and bodygroup events convert on their own.
Copy the ID events
ID events (CNmIDEvent, shown as CNmClipDocEvent_ID) do not convert. Your new clip needs the same ones as the original.
- Open the original decompiled
.vnmclipin a text editor. - Find every ID event.
- Copy them into your new
.vnmclip. - Check again that they are there after any later DMX swap.
Set up aim clips
Aim clips, such as aim_idle.vnmclip, are additive. They work relative to their middle frame. Set these lines in the .vnmclip:
m_additiveType = "RelativeToFrame"
m_additiveBaseFilename = ""
m_additiveBaseFrame = "UserSpecifiedFrame"
m_nAdditiveBaseFrameIdx = 31| Frames in the clip | m_nAdditiveBaseFrameIdx |
|---|---|
| 61 | 31 |
| 101 | 51 |
Match the IK chains
- In ModelDoc, add one IKChain node for each chain you wrote down.
- Copy the chain name from
m_Name. - Set the end effector bone, for example
Hand_R. - Set the bone count. It is usually 2.
- Set the target bone.
Check in the Clip preview
- Open the Clip preview tab.
- Set the filter to your skeleton.
- Refresh the Clip Browser.
- Play your clip. Check that the limbs bend the right way and the model does not flip or slide.
Compile and pack
- In the Asset Browser, right-click your
.vnmclipand recompile it. - Copy only the compiled
.vnmclip_cinto a staging folder, at the original clip's path. - Never pack the
.vnmskel_cskeleton or anyscripts/*.vdata_cfile. A shipped skeleton breaks other mods and breaks after updates. - Pack the staging folder. Follow Pack your mod into a VPK.
- Test the move in game. Follow Test your mod in game.
Common problems
This is where community knowledge stops for now. The guide's author has no AnimGraph 2 editor. The length and frame-rate rules come from testing, not from Valve.
Next steps
Divine is adding Deadlock mods. When they arrive, you'll publish yours from the Creator Panel.
Keep your clip working after the next game update.
Credits
This guide is based on the work of these creators. Check out their original guides.
- Guide: Custom animation VmClip guide from Deadlock Modding Notes.
- Video: Deadlock - Simple Animation Changes by Pugzilla.
- Tool: PulseSrcOps by ToppiOfficial.